Stab Binding Journal Directions..........
Directions for Stab Binding Book
 Step 1: Measure and cut your chip-board for the covers. Because you need a hinge, you're going to cut two cover pieces, and two spine pieces. When you paper these, you will leave a small gap between the cover and the spine, and the paper left there will act as a spine, allowing flexibility. It is actually plenty strong, although it doesn't sound like it. I use a good craft knife (Fiskars makes the BEST one) and a steel ruler (Fiskars all the way here, too!) to cut through the heavy chip-board. It usually takes quite a few strokes to get all the way through. (Do you remember the days before paper trimmers, when this is how we cropped our photos?? Yikes!!! hehe
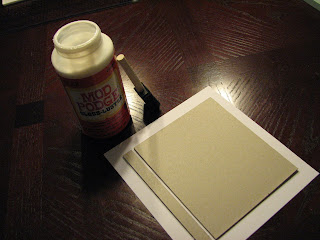 Step 2: Cut your cover paper for the outside of the front cover...I leave a little over an inch around each edge...and apply adhesive to your chip-board. Lay the now sticky chip-board down onto the paper, smooth, and allow to dry. Remember to leave your small strip for a spine.
HINT: Try using fabric for a different look. If you aren't worried about archival quality, wallpaper makes a surprisingly beautiful and sturdy covering.

Step 3: Make a cut into each corner of your cover paper to allow for smoother folding. Apply adhesive to the remaining flaps, and fold over on all four sides. Weight the paper and allow to dry (if neccessary). Repeat all steps for back cover.

Step 4: Choose colour for inside of covers, cut to size, and apply with adhesive. I apply them only to the cover, and not the 'spine' or the 'hinge'. This allows better movement of the hinges. Again, allow to dry until completely set.
HINT: If desired, you can add a tie-shut ribbon by applying it under the plate on the inner cover before gluing everything down.

Step 5: Cut your pages to an exact size. I usually make it about 1/4" narrower and about 1/3: shorter (top to bottom) to ensure nice, neat edges, but I have had everything match up very nicely before. Just be certain that you measure three times, and cut/drill/etc. once!!
=0 ) If you use paper for the pages that have much weight to them, be certain that they are well pre-scored (I forgot to photograph that part!). I always line up the back of the pages with the back of the spine, so I simply measure to where the hinge would be, then score at that point.

Step 6: Line it all up! You can see here what I meant when I said I don't have the pages quite as wide as the boards. You can also, if you look very closely, see where I scored the hinges. (Careful...don't tear the paper while scoring!) In this book, I have alternated pink and yellow pages. There are 30 pages of cardstock in this one. Use two binder clips on the end you will NOT be drilling in order to hold everything in place.
 Step 7: You can see the binder clips in this picture. Get our your pencil and a ruler, and measure four equally placed marks. These will be your drill holes.

Step 8: Using the Fiskars craft drill, drill your holes. Some tips for using the craft drill: Drill into wood placed underneath of your object. This allows you to get a nice, clean cut all the way through. ALWAYS use both hands on the drill. This means your project may slip...SO! Grow a third hand! Haha...J/K....I usually use my foot to hold this, but sometimes my husband will help, or sometimes I will place something heavy on top of it. Why can't you use a regular power drill? B/C if you do, the rotation speed on the tip is so fast that you will burn the paper. Literally heard of people starting fires like this!!!! ALWAYS use reverse to back the drill out of the wood, and out of the book...otherwise you risk shredding your holes on exit! You can see a photo of me drilling, and one of the completed project here as well.

 Step 9: Time to bind! This is very hard to explain, and I just had to kind of try a few times to get it right. If enough people ask, I'll photograph my next one on the precise sewing order.
You are going to start at any of the holes here. Sew through the hole, and loop around the spine, being sure to leave a several inch tag of ribbon to tie the binding together when finished. So, you have a complete loop around the spine. You should have the needle coming up one side....go straight up to the next hole. Loop around the spine. You will now be on the opposite side. Go up to the next hole (or around the top of the book and down if you're up to there). You're creating an alterating ladder with loops at each hole. When you're looped around all, and have come around the top, you should be able to simply come back through the holes in an opposite pattern, making an even pattern on both sides of the book. When you reach your original hole, tie!!! (Tie tightly...this is the only knot that keeps the binding together!!! I usually add a drop of super glue to hold it better).


Step 10: Complete project! Now it is up to you to decorate as you choose. SOOO many good ideas for this:
1. Send pre-cut pre-decorated pages to family members to have them write favorite recipes, birthday wishes, etc., onto. Have them send them back and bind them.
2. PERFECT for circle journals...everyone makes a pre-sized page, leaves the spine area blank, and sends them to one person to bind for them.
3. Bind post cards from a trip like this. Just 'stab' one end. Journal your thoughts of the places onto the back.
4. Use it as a journal...write in it, record thoughts during a vacation, pre-decorate as an address book, etc.
5. Use it as a mini-scrap-book. Predecorate the pages, or do so first and then bind!
6. I made one in custom colours for my friends wedding. I used handmade paper pages with uneven edges to give it a *really* handcrafted feel and in exactly their wedding colours. A couple of very nice scrapping pens were left with it, a wallet photo sized area marked off on each page, and guests were asked to write their messages to the new couple around the photos. Before the book was bound, various pages were sent around to co-workers, church members, family and friends who were unable to attend the wedding as well. Photo's of the event were put into each page, and they have a very beautiful and unique memory of their wedding. Something that they can quite literally say no-one else has.
The possibilities really are endless.


A few photo's of a finished project.
Have fun!!!!
And, if you think about it, please share photos of your completed project!
=0 )
Labels: book, craft, home-made, homemade, journal, stab binding journal
posted by Trinkapuppy @ 8:20 PM
2 Comments
![]()
